1. Register your ISP account
https://portal.gtlradius.com/isp_register.php · or https://gtlradius.com/#registerNew ISPs can register themselves. Fill in personal details, company info, and choose a username + password.
- Open the registration page (portal link above, or Register your account on the login page).
- Complete Personal Information: full name, username, email, phone.
- Complete Company Information: ISP name, service type (Hotspot / PPPoE / Both), optional subscriber band, country.
- Set Account Security: password (min. 8 characters) and confirm password.
- Click Create My Account.
- Once your account is activated, sign in at
https://portal.gtlradius.com/login.php.
| Field | Required | Notes |
|---|---|---|
| Service type | Yes | Hotspot, PPPoE, or Both |
| Username | Yes | 3–50 chars; letters, numbers, dot, underscore, hyphen |
| Password | Yes | Min. 8 characters — use the same password when you sign in |

isp_register.php)
2. Add your first router (NAS)
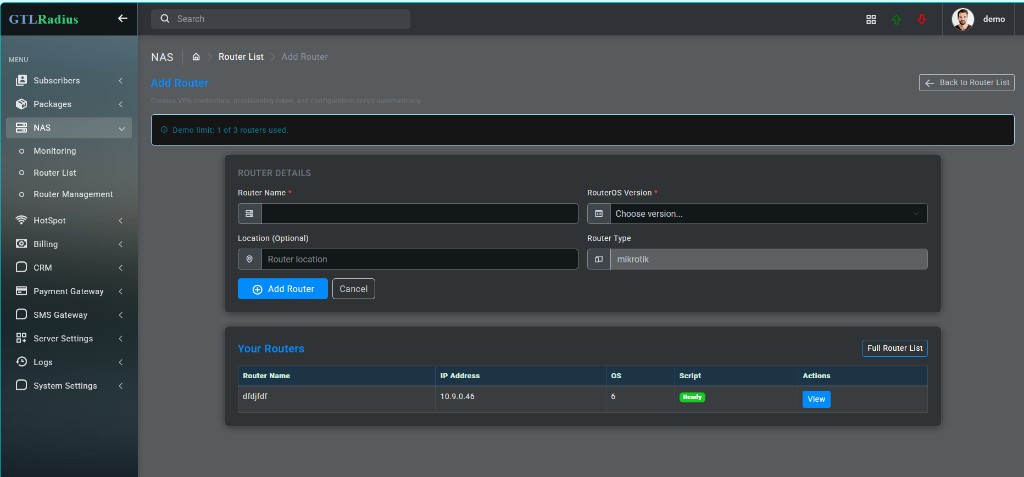
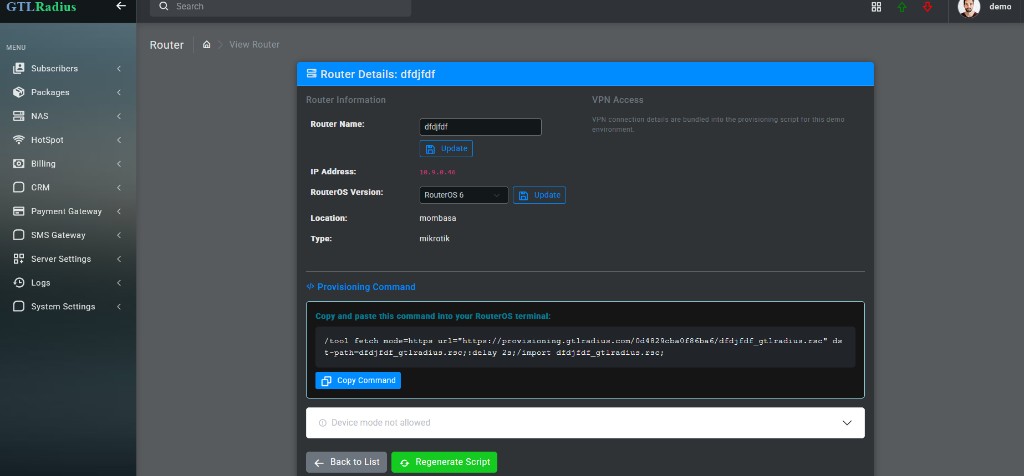
Each MikroTik router is added as a NAS. The system generates VPN credentials and a provisioning script for RouterOS.
- Log in to your ISP admin account.
- Go to NAS → Router List.
- Click Add Router.
- Enter Router Name (e.g.
Main-POP). - Select RouterOS Version:
6or7(must match your MikroTik). - Optionally set Location.
- Click Add Router.
- On the provisioning page, copy the VPN details and run the script on your MikroTik.
- Verify the router appears in NAS → Monitoring.
| Field | Required |
|---|---|
router_name | Yes |
router_os (6 or 7) | Yes |
des (location) | Optional |
3. Create a billing package
Packages define price, duration, and speed for Hotspot or PPPoE customers. Available types depend on your tenant module.
- Go to Packages → Package Create.
- Enter Package Name (e.g.
1Day-5Mbps). - Enter Package Price (KES).
- Select Package For: Hotspot or PPPoE.
- For Hotspot: optionally pick a specific router or leave All routers.
- For PPPoE: optionally set Installation Fee.
- Set Duration (value + unit: Minute / Hour / Days / Month / Year).
- Set Speed (value + Mbps or Kbps).
- Click Create and verify under Packages → Package List.
| Tenant module | Can create |
|---|---|
| Hotspot | Hotspot packages only |
| PPP | PPPoE packages only |
| Dual / Full | Both Hotspot and PPPoE |

4. Add M-Pesa payment gateway
Connect M-Pesa so customers can pay via STK Push or paybill. Requires Full or Admin permission.
- Go to Payment Gateway → Add Gateway.
- Choose collection method:
- Own Paybill — your Safaricom paybill + Daraja API keys
- Till Number — Buy Goods till (uses platform template)
- Bank Account — bank paybill + account number
- Fill the credentials for your chosen type.
- Set Usage/Service Type: All, Hotspot, or PPPoE.
- Set Status to Enabled.
- Click Save Configuration.
- Confirm under Payment Gateway → Gateway Settings.
- Register Safaricom callback URLs if using paybill/C2B (see
PAYMENT_GUIDE.md).
| Gateway type | Key fields |
|---|---|
| Own Paybill | Paybill number, Consumer Key, Consumer Secret, Pass Key |
| Till | Till number |
| Bank | Bank paybill, bank account number |

5. Add SMS gateway
Configure SMS for payment confirmations, expiry reminders, and customer notifications.
- Go to SMS Gateway → SMS Gateway List.
- Click Add Gateway.
- Select your SMS Provider (Onfon, GatewaySMS, Africa's Talking, Mobilesasa, etc.).
- Enter provider credentials (Sender ID, API key, shortcode — varies by provider).
- Optionally set a Display name (alias).
- Click Save Gateway.
- Test under SMS Gateway → SMS Balance.
- Configure templates under SMS Gateway → SMS Template (payment, expiry, welcome, etc.).
| Provider examples | Typical fields |
|---|---|
| Onfon / GatewaySMS | SenderId, ApiKey, ClientId, AccessKey |
| GatewaySMS bulk | shortcode, ApiKey, partnerID |
| Africa's Talking | username, ApiKey, sender_id |
| Mobilesasa | api_token |

Quick startup checklist
- ISP registered at
isp_register.phpor gtlradius.com - ISP logged in successfully
- First router added and provisioning script applied on MikroTik
- Router online in NAS Monitoring
- At least one Hotspot or PPPoE package created
- M-Pesa gateway added and enabled
- SMS gateway added and balance checked
- SMS templates enabled for payment / expiry alerts
Adding screenshots
See the full step-by-step capture guide: SCREENSHOTS.md
Save PNG files to screenshots/ using the filenames in the guide. Public pages (register, login, marketing site) can be captured with node capture-screenshots.js. Admin pages require logging in first — details in SCREENSHOTS.md.